Whats up everyone, I wanted to talk to you this week about a video we just completed and walk you through the processes and learning experiences we had while working on it. Flimp Media approached us to shoot a unique video for this startup Xpandu. Xpandu puts a pretty fantastic spin on crowdsourcing, using ideas as the foundation and karma points as the reward. People helping others to complete amazing new projects, this was definitely something Yup Video wanted to be apart of.
[bra_divider height=’20’]
[bra_highlight style=’highlight1′]Step 01: Getting the idea.[/bra_highlight]
We started throwing around different concepts for an explainer video but we wanted this to go beyond explaining the website. So we went back to the beginning and decided that the best way to get the essence of the website through to the viewer, we would need to have a strong script.
*Click here to download the script*
[bra_divider height=’20’]
After we had the script nailed down we envisioned a live shoot using hand drawn sketches inside of the video. This was a huge task for us to embark on as we have never done this amount of animation inside of a live action video.
[bra_divider height=’20’]
[bra_highlight style=’highlight1′]Step 02: On to pre-production.[/bra_highlight]
We continued the process as normal, creating an audio visual script (view here) then Cristian made a rough storyboard.
*Click here to download the Storyboard*
We knew that we would need to make some on the fly changes, so we made sure to leave plenty of room for improvising.
[bra_divider height=’20’]
The budget was good but seeing as it was a budget for an explainer video, we were pretty tight on funds. After getting equipment, location, wardrobe, food and drinks, and paying the help, we had nothing left for an actor (Equipment listed below). That meant yours truly had to be the star of this show. Not something that I am accustom to doing, to say the least.
[bra_divider height=’20’]
[bra_highlight style=’highlight1′]Step 03: The shoot.[/bra_highlight]
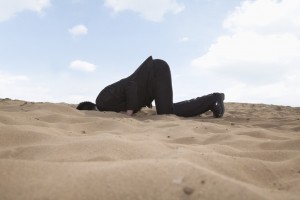
On the day of the shoot everything was going perfect. Everyone was ready and all the equipment made it through. Even the Pizza was on time. And then the wind and snow started! It really started.
[bra_divider height=’20’]
The wind was so crazy it knocked over all of our lights, destroying one and making shooting impossible, even with all the weight we put on them. The fact that it was 25 degrees didn’t help either.
[bra_divider height=’20’]
About 6 hours later, we got through the shoot by a thread with all the shots we wanted. There are a million things I would do over or different if we could but we had to stick with the dreaded “good enough”.
[bra_divider height=’20’]
[bra_highlight style=’highlight1′]Step 04: Post production.[/bra_highlight]
Next, we moved on to post production. After creating a rough cut in editing we moved right into audio replacement (ADR). We recorded audio on the shoot but because of the crazy wind and short staff we couldn’t use any of it. The ADR went pretty smooth, a few hours in the recording studio and a few hours of audio magic and you have a solid believable replacement.
[bra_divider height=’20’]
Original Audio:
ADR’d Audio + Music:
[bra_divider height=’20’]
With a rough cut edit and the ADR finalized we moved into animation and special effects. We started in After Effects to use mochas tracker and the roto brush tool which made the rotoscoping process blazingly fast. With a few clicks we had some solid mattes to use in our motion graphics software. It just so happens our choice is Apple Motion. I know, no one uses it but trust me when I say, something that takes 3 hours in After Effects takes 30 minutes in Motion.
[bra_divider height=’20’]
[bra_highlight style=’highlight1′]Step 05: Days and days of animation.[/bra_highlight]
After all of the assets were created, we went in and started animating. Animation is by far the most time consuming part of the process, but it’s also the part the makes this video special.


[bra_divider height=’20’]
[bra_highlight style=’highlight1′]Step 06: Adding sound effects.[/bra_highlight]
After the animation was complete, the last step was sound effects. We wanted it to feel like each animation was being hand drawn on screen and the sound effects helped sell that.
[bra_divider height=’20’]
Without Sound Effects
[bra_divider height=’20’]
With Sound Effects
[bra_divider height=’20’]
[bra_highlight style=’highlight1′]Step 07: Enjoy the final product.[/bra_highlight]
All and all we’ve learned a ton on this project and hope to do more like it soon. Thank you to all the troopers who helped us on this. Crazy wind, crazy cold, crazy deadline. I’m very happy with what we’ve created.
[bra_divider height=’20’]
[bra_highlight style=’highlight1′]Equipment:[/bra_highlight]
On Shoot
Camera: Canon 5D MK3
Lenses: Canon 85mm, Canon 50mm, Sigma 35mm
Lights: 4x Florescent Soft Boxes
Teleprompter: OnTakeOnly iPad Prompter
[bra_divider height=’20’]
Post Production
Workstation: 15′ Macbook Pro Retina
Editing Software: FCPX
Audio Software: Cubase 7
Audio Mic: Blue Spark
Special Effects: After Effects CC
Motion Graphics: Apple Motion 5
[bra_divider height=’20’]
[bra_highlight style=’highlight1′]People:[/bra_highlight]
Agency: Flimp Media
Production: Yup Video
Director / Producer: Jimmylee Remillard
Creative Assistant: Steve Garofalo
Illustration: Cristian Lungu
Camera & DP: Mike Rivera
Production Assistant: Kayla Glasson
Gaffers: Justin Gillette, Dillon Meunier
[bra_divider height=’20’]
Special Thanks:
Brett Dumas (IQ-Ink.com) and Kerrie & Wade Dumas